
Importance Of Soil Testing
OR
How To Save on Unnecessary Fertilization
Every crop or plant require different nutrients and in different quantities at different stages of its life cycle. The farmer needs to take decision on this after carefully carrying out a thoughtful exercise. The soil and water itself have nutrients available and therefore it is cost economic first to have proper soil and water testing done, analyzed and evaluated, and, then only make only the required addition of fertilizers to bring up total content of nutrient up to mark for the particular crop or plant.
Gone are the days when one would happily spray or distribute all types of fertilizers in the field, sow the seeds, water the land and then be happy that he has done the best and now nature will reward him with its bounty. The arable land is constantly shrinking due to many reasons – expansion of cities, rapid industrialization, expanding colonies, road networks. The mankind is growing very fast. The happy go lucky attitude will not do now. One now needs to work out how to optimize the produce from his farming. Agriculture has now become a science and industry – and happily both science and industry have come forward to help the farming community.
There are three important stages in any crop life cycle:
- Sowing stage
- Growing stage
- Maturity stage
The stages would take different time spans depending on the particular variety sown or cultivated or planted. The nutrient requirement for three stages seldom remains same. Therefore one would need to schedule fertilization according to the particular stage after having soil testing.
From where plants get nutrition
Sun, water and soil have for ages provided all nutrients of all kinds available for plants. The soil is giver of nutrients to plants. Water also is a giver of nutrients. The soil however differs from place to place and all soils do not yield equal doses of nutrient contents required for the plants. Here is where science helps in understanding the soil i.e. the physical aspects of soil, its chemistry and biology. Physical aspects include TEXTURE, WATER CONTENT, WATER HOLDING CAPACITY, and WATER FILTERING CAPACITY. Biological properties would include how much respiration is in the soil, whether earth worms are present. Chemical properties include pH and E.C. and soil minerals levels.
Soil Test act as aid in determining nutrient requirment
In determining requirement of fertilizers, the first step is to know the levels of the nutrients available within the soil mass and in water which is used for irrigation. With this knowledge, the farmer would be able to take an informed action to supplement the exact nutrient required by the plants at each stage of its life cycle. SOIL and WATER tests do just that. Both SOIL and WATER TESTING would determine the E.C. as indicator of salinity (or presence of minerals), the pH as measure of alkalinity or acidity and the individual mineral content mainly N, P, K, Ca, Mg and specialized for others such as Fe, Mn, B, Zn etc.
Steps for soil and water testing
- Collect samples
- Analysis of samples
- Interpretation of the analysis
Collection of Samples
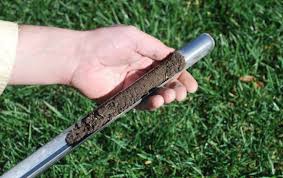 The collection of samples involves collecting earth samples in small quantity from a number of pre-determined spots of the land. The selection of these pre-determined spots is based on the topography of the land and must include any type of land generally different from rest of the land. If the field is uniform even one sample per field may be enough. In case different crops are planned, a Grid survey suitably divided would be beneficial. Generally, land where piles of manure are there or nothing is to cropped, are not tested.
It is advisable that samples are taken from about 4 to 6 inches depth from the top layer which is the root zone; however if the root zone is deeper or shallower then samples are required to be taken accordingly. Various tools are used for collection of samples.
After collection at each selected point, all samples collected are put in a plastic bag. All samples are mixed together at the last; the samples of different type of land are kept separate. The reason for taking deeper samples is that top soil receives fertilizers but roots are below and we need to know how much nutrient is available in the root zone.
Analysis of samples for E.C. (general ppm of N, P and K) and pH
The collected sample is handed over to the Soil Testing Laboratories. There are normally government run laboratories but there are also specialized private laboratories. The difference would be that former would be having a pre-set number of tests whereas the latter would be able to do a number of additional specialized tests in addition to normal tests.
The soil is first aggregated, cleaned of any stone particles, grass or big boulders. It is now dried out in the sun after which it is powdered.
This powder is taken by a set volume and then mixed with pH neutral water. According to test methods, different dilution volumes may be used. One is to use same volume of water as the sample; the second is to use twice the volume of water as the sample and third also used is have a further diluted solution by having greater volume of water as the sample.
Here it needs to be understood that whatever method of dilution is used, the same needs to be continued for any further soil testing.
The E.C. and pH can easily also be measured by the farmer as there are a number of portable pen type meters available in the market.
Specific analysis of soil samples for Nutrients
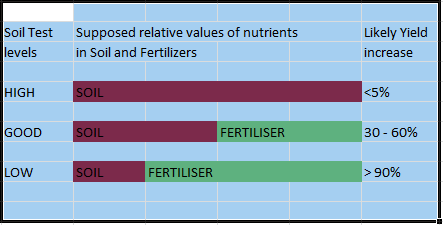
This test can be performed by soil labs only and to a certain extent by purchasing soil testing kits which can test for N, P, and K separately. Depending upon the method followed by individual soil testing laboratory, different extraction methods may be used for extracting the N, P and K contents. Such extraction method is written in the test report. The extraction methods followed generally are not uniform across the soil laboratories and one could get different results for the same sample. The test results are not absolute numbers but are empirical numbers. The farmer again needs to keep continuity with the same soil test laboratory for all further test results. The test result in addition to numbers may also indicate terms like “LOW”, “GOOD” /”HIGH”
A HIGH would mean cutting down on fertilizer and LOW on apply more of fertilizer. see this indicative chart.
Interpretation of tests
Now that both the samples of soil and water have been tested at first what leaps to eye is the E.C. and pH of the soil and water and what it tells is the presence of minerals in both and the acidic or saline nature. Further reading of the analysis brings out individual component of nutrient present in soil and water. Aided with this knowledge the scheme for fertilization is drawn up which would include adding particular nutrients to increase nutrient levels and pH levels to optimum for that crop.
The pH values of soil and water are also to be studied. It is known that difference types of crops, plants, flowers prosper much more in particular pH range. The addition of fertilizer is also to be selected so that correct pH conditions can be obtained in the soil. See also Let us talk about Fertilizers
The fertilization scheme would also include doses, rates at which dose are to given, timing, and irrigation management. It may be stated that soil testing is an economic cost in the production of crops. It is time consuming. By itself a soil test would not prevent crop growth due to pests, diseases, bad irrigation etc. As shown in the chart above, if the soil is having High nutrient, there no need for adding fertilizer and the probability of increasing yield is less.
The yield versus fertilizer application rate is discussed in more details by me in my post.
The importance of the soil and water tests is in maximizing our yield while economizing on fertilizer cost.
As discussed above we may summarize as follows:
- Determine need for fertilizer nutrients by SOIL TESTS.
- Take care of pH of soil and water
- Choose crop most suited to your land characteristics
- Take advantage of nutrient already available in soil and water
- Maximize efficiency by giving only required fertilizers
- Avoid unnecessary additions of fertilisers
Please feel free to share your views and comments.
Hi ; I have had opportunity to travel widely and have keen watched whatever farming practices the local farmers were engaged in. Back home been growing gerberas mostly in polyhouses, but outside in kitchen garden as well. i love these hardy perennials. good for business too if done in a routine orderly scientific manner. Also engaged in farming of wheat and organic vegetables on a small scale for me and family. My service profile has been that of an electronic and telecom engineer and now am engaged in web site creation and blogging.
Leave a Reply