The Inter Government Panel on Climate Change (IPCC) has brought out its Report recently.
The report has studied current and future impact on Climate Change by human interactions such as generation of the greenhouse gases (GHG), air pollutants, aerosols, rapid urbanization of farm lands, solar and volcanic activities.
Present scenario
Report comes out with high confidence that human-induced climate change is the main driver of frequent Hot extremes (including heat waves) across most land regions since the 1950s, while cold extremes (including cold waves) have become less frequent and less severe. Heavy precipitation events have increased since the 1950s.
Agricultural and ecological droughts have increased in some regions due to increased land evapotranspiration. It is likely that the global proportion of major (Category 3–5) tropical cyclone occurrence has increased over the last four decades.
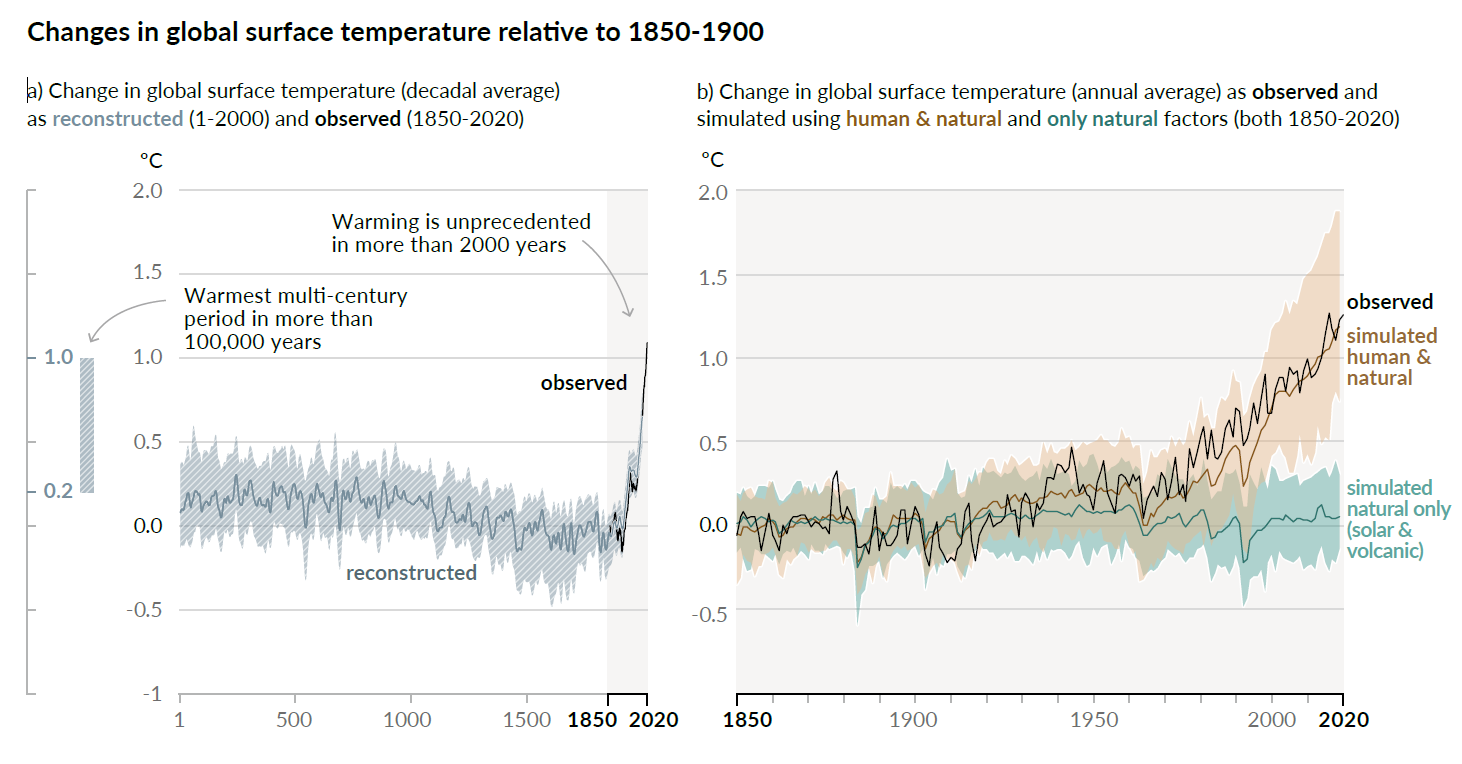
Climate change is already affecting every inhabited region across the globe with human influence contributing too many observed changes in weather and climate extremes. World has witnessed wild forest fires, hurricanes and cyclones, extreme precipitation, extreme changes in temperature, melting of glaciers etc. This is when average temperature rise has been around 1.1 degrees C.
Possible Climate Futures
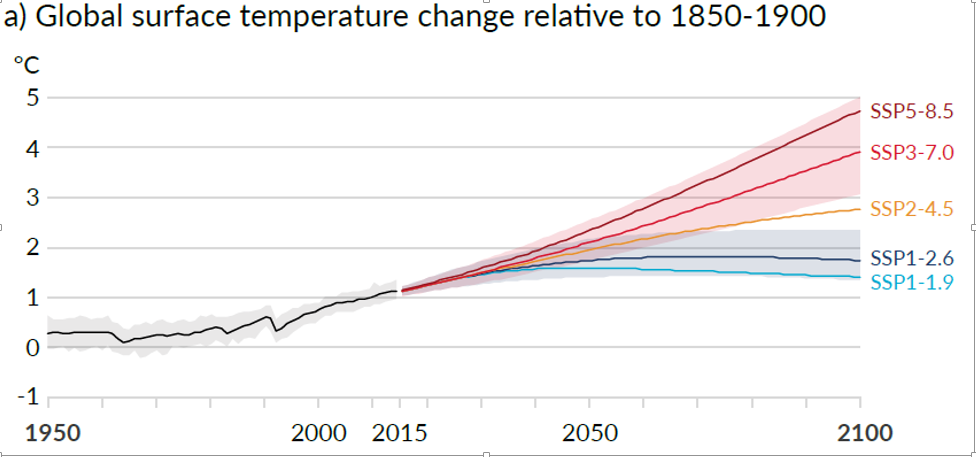
A set of five new illustrative emissions scenarios is considered in this report to explore the climate response to a range of greenhouse gas (GHG), land use and air pollutant futures. These projections also account for solar activity and background forcing from volcanoes.
Results over the 21st Century are provided for the near-term (2021–2040), mid-term (2041–2060) and long-term (2081–2100) relative to 1850–1900, unless otherwise stated.
If humankind manages it’s environs very well temperature increases will be very less than current levels for that period. Otherwise high dangerous levels of increase are forecast. (see notes below for explanation of SSP scenarios.
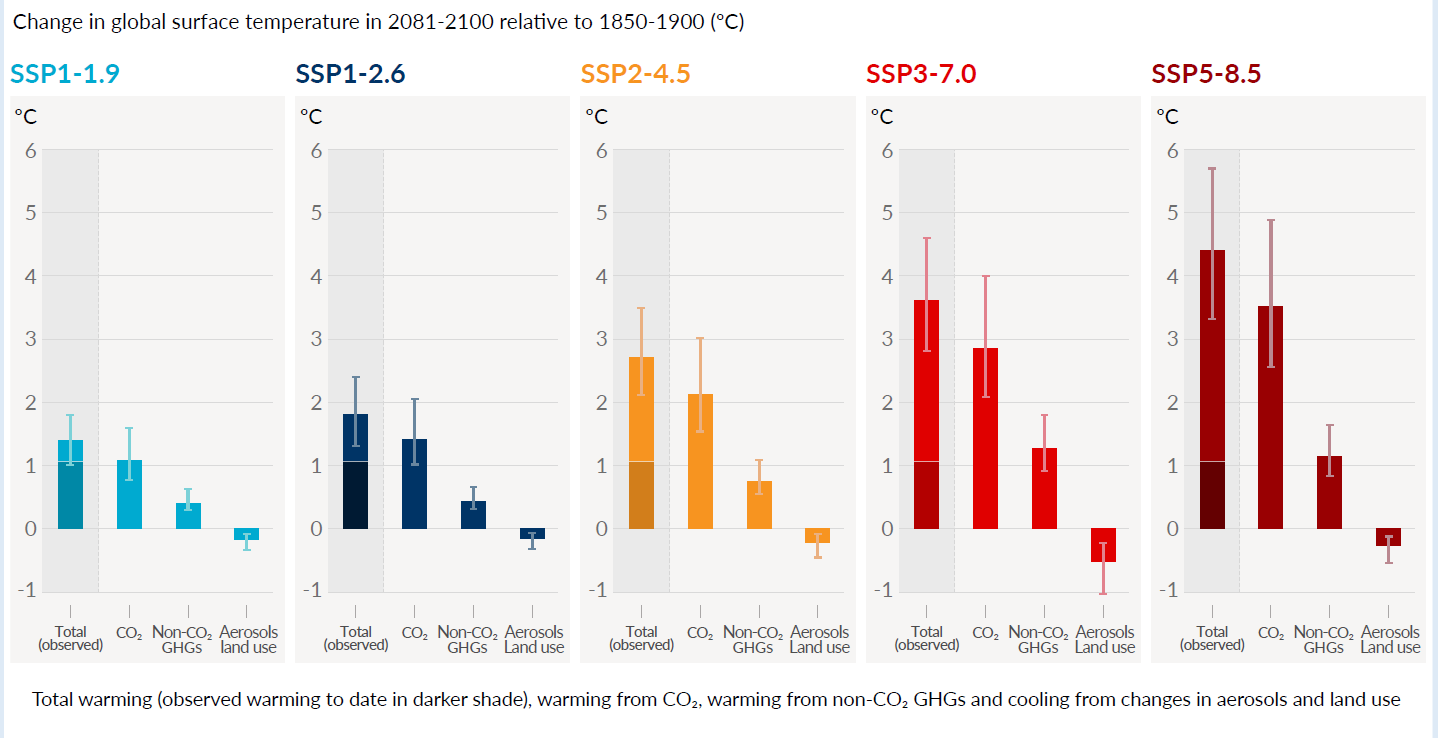
Under scenario SSP5-8.5 with very high GHG emissions the 1.5°C global warming level is very likely to be exceeded to even 4 degrees C.
Under scenario SSP1-1.9 with low and controlled GHG, the 1.5°C global warming level it is more likely than not that global surface temperature would decline back to below 1.5°C toward the end of the 21st century, with a temporary overshoot of no more than 0.1°C above 1.5°C global warming.
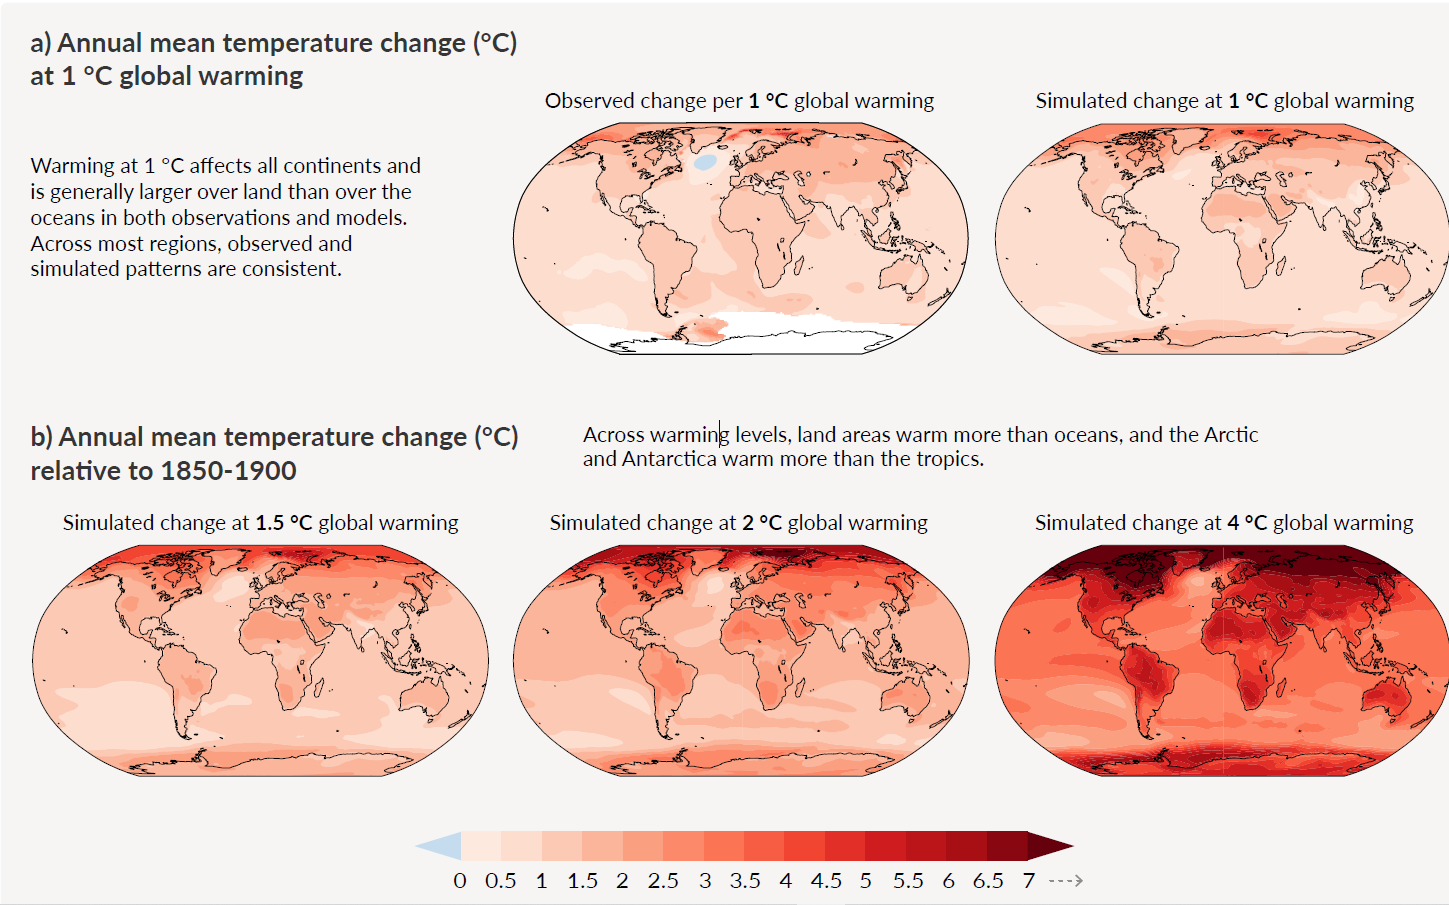
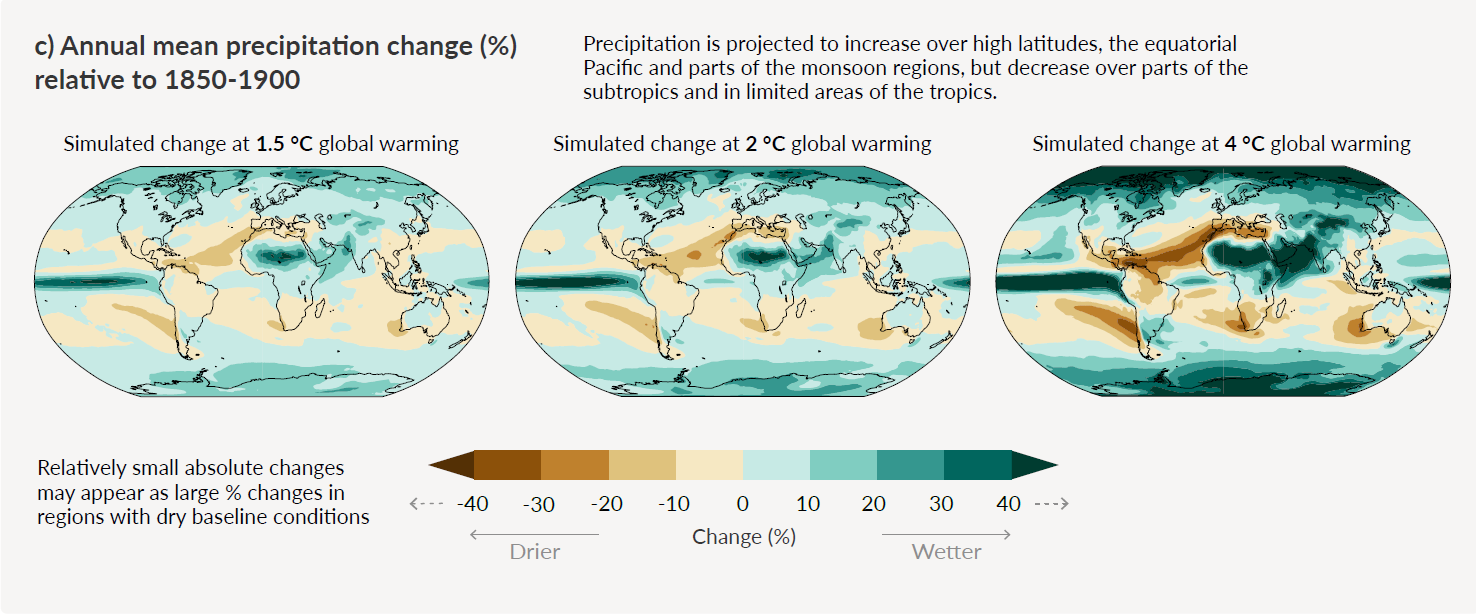
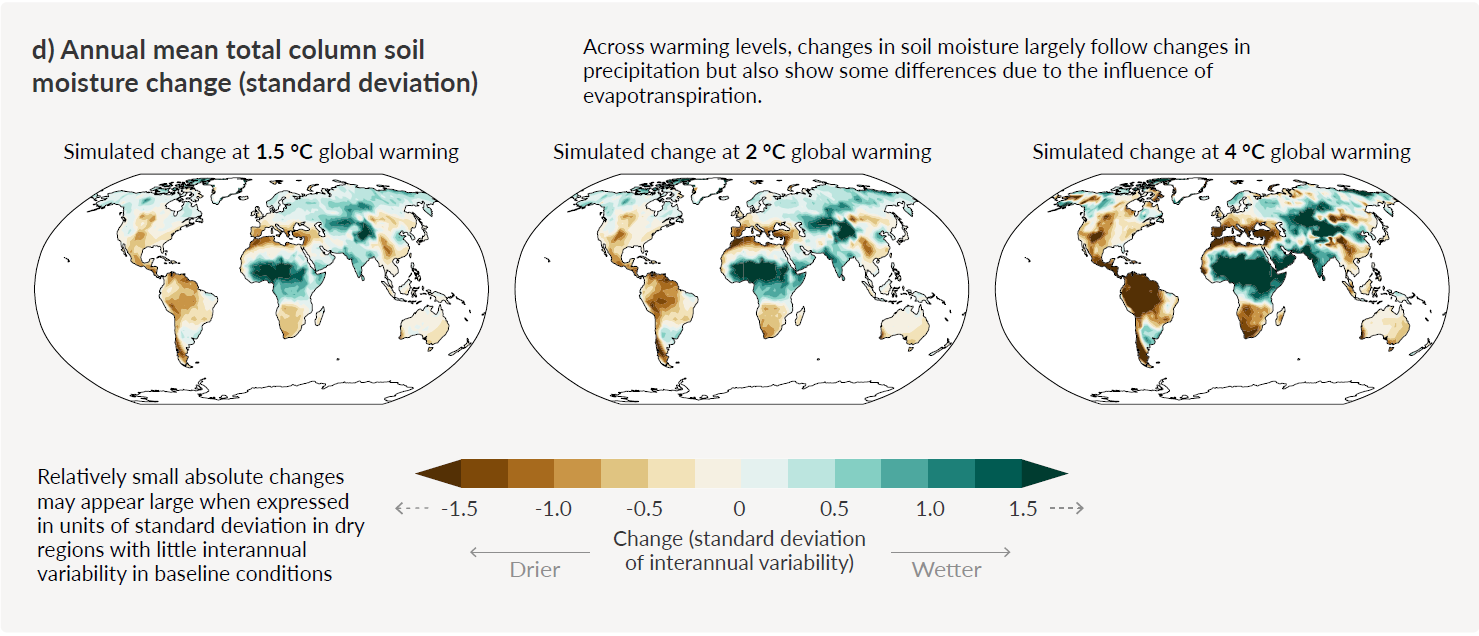
Every additional 0.5°C of global warming causes clearly discernible increases in the intensity and frequency of hot extremes, including heat waves (very likely), and heavy precipitation (high confidence), as well as agricultural and ecological droughts in some regions (high confidence).
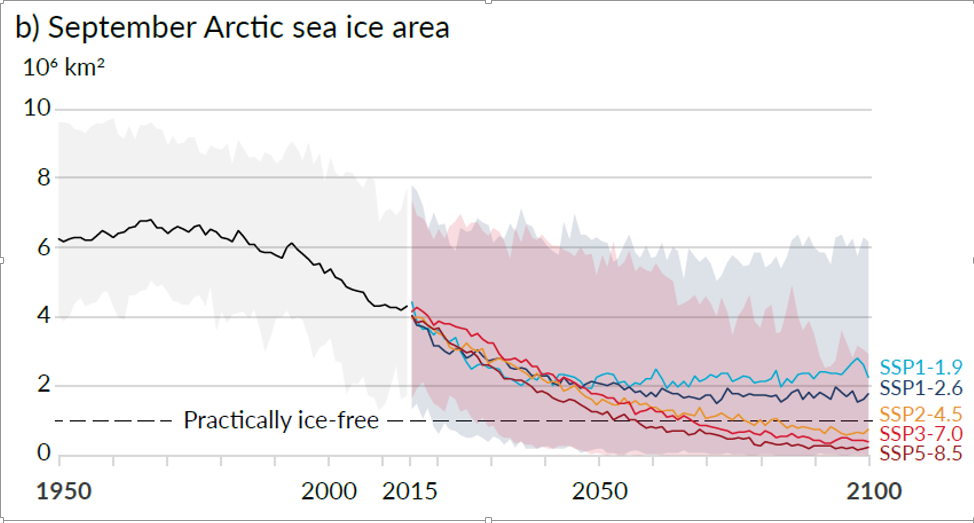
Additional warming is projected to further amplify permafrost thawing, and loss of seasonal snow cover, of land ice and of Arctic sea ice (high confidence). The Arctic is likely to be practically sea ice free in September at least once before 2050 under the five illustrative scenarios with more frequent occurrences for higher warming levels. There is low confidence in the projected decrease of Antarctic sea ice.
The following figures show what difference every increment of global warming makes in regional mean temperature, precipitation and soil moisture.
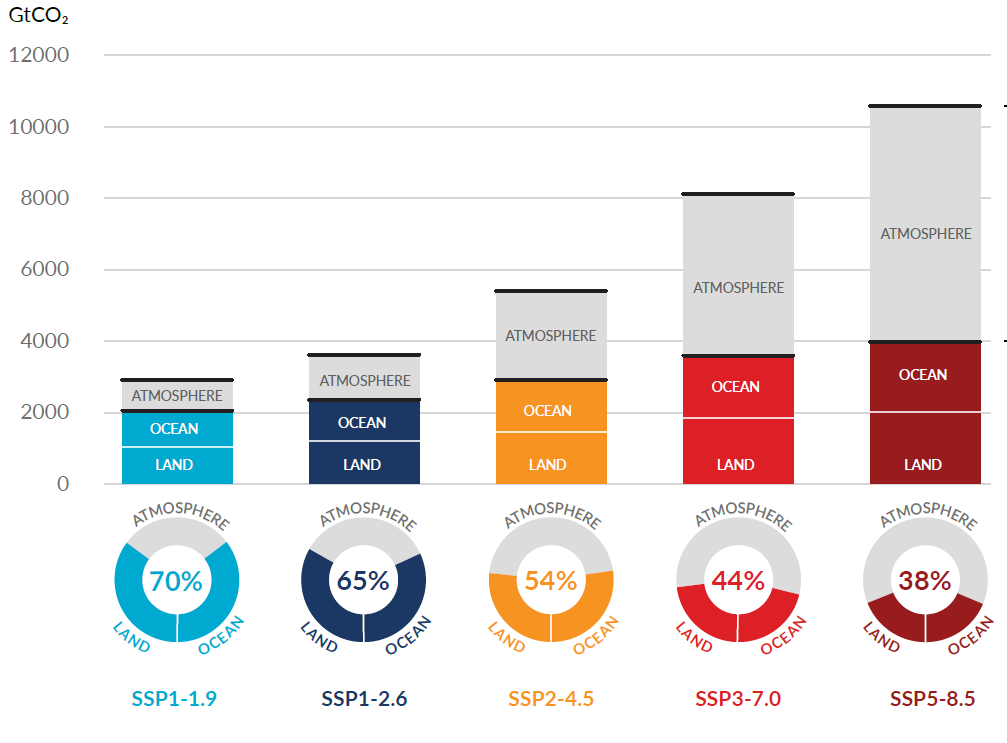
Under scenarios with increasing CO2 emissions, the ocean and land carbon sinks are projected to be less effective at slowing the accumulation of CO2 in the atmosphere.
See figure below.
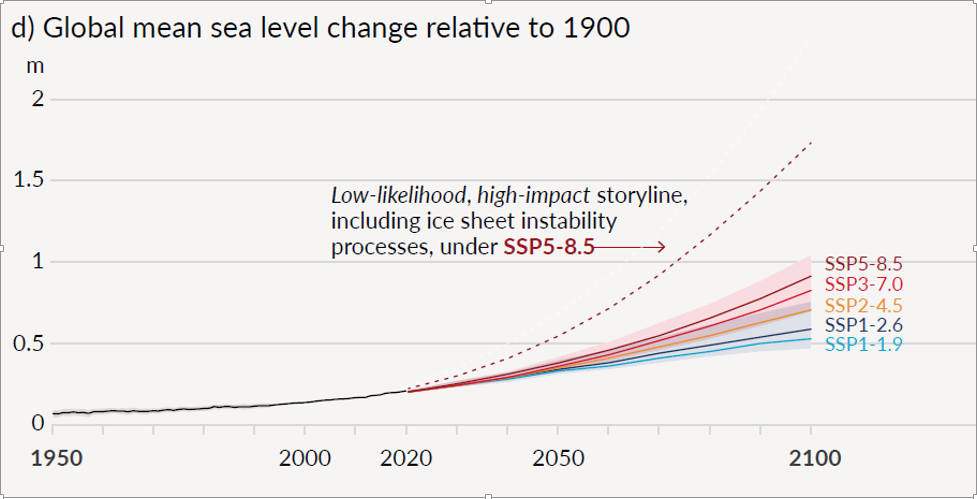
Many changes due to past and future greenhouse gas emissions are irreversible for
Centuries to millennia, especially changes in the ocean, ice sheets and global sea level. Whatever we have allowed to happen has caused such damage that it will take centuries to undo the same.
Selected indicators of global climate change under the five illustrative scenarios
With further global warming, every region is projected to increasingly experience concurrent and multiple changes in climatic impact-drivers. Changes in several climatic impact-drivers would be more widespread at 2°C compared to 1.5°C global warming and even more widespread and/or pronounced for higher warming levels.
Cities intensify human-induced warming locally, and further urbanization together with more frequent hot extremes will increase the severity of heat waves (very high confidence). Urbanization also increases mean and heavy precipitation over and/or downwind of cities (medium confidence) and resulting runoff intensity (high confidence).
In coastal cities, the combination of more frequent extreme sea level events (due to sea level rise and storm surge) and extreme rainfall/river flow events will make flooding more probable (high confidence).
Limiting Future Climate Change
From a physical science perspective, limiting human-induced global warming to a specific level requires:
- Limiting cumulative CO2 emissions, reaching at least net zero CO2. We need to adopt limit tree cutting and also expand our forest cover. Other more advanced methods like carbon storage in suitable rocks in carbonate form and increasing farm soil extent are also solutions besides several others.
- Strong reductions in other greenhouse gas emissions.
- Strong, rapid and sustained reductions in CH4 emissions.
- We need to re-plan and re-design our urbanization methodology to provide for more tree cover and open spaces.
Every tonne of CO₂ emissions adds to global warming. Changes are irreversible for many centuries.
Scenarios with very low or low GHG emissions (SSP1-1.9 and SSP1-2.6) lead within years to discernible effects on greenhouse gas and aerosol concentrations, and air quality.
It is not only the governments alone but the entire mankind wherever they may be on this mother earth to urgently and immediately take up steps to mend and correct our human interactions. Save our Climate and not let it Change for worse.
Further Reads: 1. https://myknowledgebase.in/climate-change-agriculture-practices-india-farming/
2. https://www.ipcc.ch/report/ar6/wg1/
Acknowledgement: This blog is based on, and contains some text and figures, from IPCC AR6
EXPLANATION OF TERMS
- Human-caused radiative forcing of 2.72 [1.96 to 3.48] W m–2 in 2019 relative to 1750 has warmed the climate system. This warming is mainly due to increased GHG concentrations, partly reduced by cooling due to increased aerosol concentrations.
- The five illustrative scenarios are referred to as SSPx-y, where ‘SSPx’ refers to the Shared Socioeconomic Pathway or ‘SSP’ describing the socioeconomic trends underlying the scenario, and ‘y’ refers to the approximate level of radiative forcing (in W m–2) resulting from the scenario in the year 2100
- Each finding is grounded in an evaluation of underlying evidence and agreement. A level of confidence is expressed using five Qualifiers: very low, low, medium, high and very high, and typeset in italics, for example, medium confidence.